


How diaper your baby step step instructions is your comprehensive guide to mastering the art of baby diapering. From understanding the different types of diapers to mastering the techniques for changing them, this guide covers everything you need to know to ensure a comfortable and healthy experience for your little one. We’ll explore essential supplies, hand hygiene, and common scenarios, providing practical advice for every stage of your baby’s development.
This detailed guide will provide a clear understanding of the steps involved, from preparation to safety measures. We’ll cover various aspects, including different diaper types, preparing for diapering, specific diapering techniques, and handling potential issues. The information is organized to help you easily navigate the process and ensure the best care for your baby.
Introduction to Diapering
Diapering is a fundamental aspect of newborn care. It’s a routine task that, when done correctly, ensures a baby’s comfort and hygiene. Proper techniques prevent diaper rash, promote healthy skin, and contribute to a positive parent-baby bonding experience. This section will provide a comprehensive overview of diapering, including different types of diapers and the steps involved in the process.
Types of Diapers
Diapers come in two primary forms: disposable and cloth. Understanding the differences between these types will help parents choose the option that best suits their needs and values.
- Disposable Diapers: Disposable diapers are pre-packaged, absorbent units that are designed for easy disposal. They are widely used due to their convenience, minimal effort in changing, and availability in various sizes and absorbencies.
- Cloth Diapers: Cloth diapers are reusable fabric diapers. They are a more environmentally friendly option as they can be washed and reused. Cloth diapering requires a bit more effort in terms of washing and storage but can be more economical in the long run, reducing waste.
Advantages and Disadvantages of Each Type
The choice between disposable and cloth diapers depends on individual preferences and circumstances. A comparison of their advantages and disadvantages is presented below:
| Feature | Disposable Diapers | Cloth Diapers |
|---|---|---|
| Cost | Generally higher upfront cost but lower ongoing cost | Lower upfront cost but higher ongoing cost for laundry and supplies |
| Convenience | Extremely convenient, easy to use, and readily available | Requires more effort, particularly in terms of washing and storage |
| Environmental Impact | Significant environmental impact due to plastic waste | Environmentally friendly, reducing landfill waste |
| Hygiene | High level of hygiene if used properly | Requires meticulous hygiene to prevent odor and contamination |
| Customization | Limited customization in terms of fit and absorbency | Greater customization through different materials, sizes, and styles |
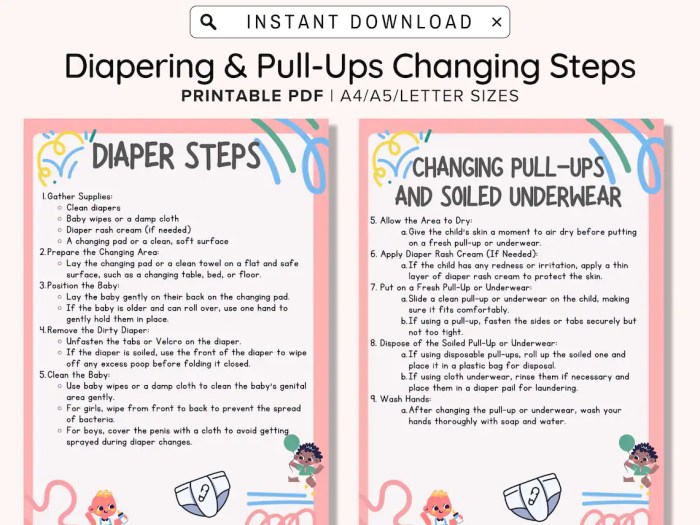
Diapering Steps
Following a consistent routine for diapering ensures a clean and comfortable experience for your baby. The steps involved in changing a diaper are Artikeld in the table below:
| Step | Action |
|---|---|
| 1. Preparation | Gather all necessary supplies, including a clean diaper, wipes, and a changing pad. Ensure the baby is lying comfortably on the changing surface. |
| 2. Removing the Dirty Diaper | Carefully remove the soiled diaper, being mindful not to irritate the baby’s skin. |
| 3. Cleaning the Baby | Gently clean the baby’s genital area with a soft, damp wipe. Ensure thorough cleaning but avoid harsh scrubbing. |
| 4. Applying the New Diaper | Place the new diaper on the baby, ensuring it fits properly and is secure. |
| 5. Checking for Leaks | After the new diaper is applied, check for any leaks to ensure the baby is properly protected. |
| 6. Wrapping Up | Ensure the baby is comfortably wrapped up in a blanket or clothes, ensuring warmth and comfort. |
Preparing for Diapering

Getting ready for diaper changes is key to a smooth and stress-free experience. Having the right supplies and knowing the proper hygiene practices will ensure a comfortable and safe environment for both you and your little one. This section details the essential items and steps to prepare for diaper changes.
Essential Diapering Supplies
Diapering is a routine part of baby care, and having the necessary supplies readily available streamlines the process. This ensures you can respond promptly and efficiently to your baby’s needs.
- Diapers: Choose the size and type of diaper that best suits your baby’s needs. Consider factors like absorbency, fit, and your baby’s weight and growth.
- Wipes: Choose hypoallergenic, fragrance-free wipes to avoid irritation. Look for wipes that are gentle on your baby’s skin.
- Diaper Rash Cream: A preventative or treatment cream for diaper rash is crucial, especially during the initial stages. Select a cream suitable for your baby’s skin type.
- Changing Pad/Surface: A clean and comfortable surface is vital for a smooth diaper change. A changing pad or a designated area on a table or surface is suitable.
- Clean Clothes: Have a supply of clean, soft clothing on hand to quickly change your baby after a diaper change.
- Disposal Bags: Use appropriate bags to dispose of soiled diapers promptly and hygienically.
- Baby Lotion: This is beneficial after changing the diaper to maintain your baby’s skin’s moisture balance.
Diaper Rash Creams
Diaper rash is a common issue for babies, but choosing the right cream can make a difference. This table provides a brief overview of various diaper rash creams and their applications.
Learning how to diaper your baby step-by-step can seem daunting, but it’s easier than you think! First, gather all your supplies. Next, consider exploring some delicious French cuisine like those featured in this list of 25 traditional French dishes you need try once 25 traditional french dishes you need try once. Once you’ve mastered those, you’ll be a pro at diapering your little one in no time!
| Cream Type | Description | Use |
|---|---|---|
| Zinc Oxide | A common, over-the-counter cream. | Excellent for preventing and treating diaper rash. |
| Hydrocortisone | Contains a steroid to reduce inflammation. | Use only as directed by a doctor, typically for more severe rashes. |
| Oatmeal-based | Contains soothing oatmeal extract. | Helpful for mild irritation and providing comfort. |
| Creams with lanolin or petroleum jelly | Can help create a barrier between the skin and moisture. | Can be helpful for preventing moisture from irritating the skin. |
Hand Hygiene
Proper hand hygiene is paramount in preventing the spread of germs and infections. Clean hands before and after every diaper change.
- Washing Technique: Wet hands with warm water. Apply soap and scrub thoroughly for at least 20 seconds, covering all surfaces, including between fingers and under nails. Rinse and dry with a clean towel or air dry.
- Importance: Germs can easily transfer from dirty hands to a baby’s delicate skin, potentially leading to diaper rash, infections, or other health concerns. This is why hand hygiene is critical.
Diapering Techniques
Diapering is a crucial part of newborn care. Mastering the technique ensures your baby’s comfort and hygiene, preventing discomfort and potential complications. This section dives into the practical steps of diapering, from changing soiled diapers to preventing diaper rash.Proper diapering goes beyond just changing the diaper. It involves understanding the baby’s needs and ensuring a comfortable, clean environment.
A well-maintained diaper routine is essential for a healthy and happy baby.
Changing a Diaper
A consistent routine for diaper changes is key. This includes gathering all necessary supplies beforehand to avoid delays. A clean surface, such as a changing table or a clean, flat area on a bed or floor, is crucial.
- Step 1: Preparation. Gather your supplies, including a fresh diaper, wipes, diaper cream (if needed), and a trash bag. Have a clean surface ready for the changing process. Having these items readily available minimizes interruptions during the change.
- Step 2: Positioning. Gently place the baby on their back on the clean surface. Ensure the baby is comfortable and secured, but not too tightly. This prevents any unnecessary stress.
- Step 3: Removing the soiled diaper. Carefully remove the soiled diaper, being mindful not to touch the baby’s genitals directly. Gently wipe the baby’s bottom with a wet wipe, ensuring all areas are cleaned thoroughly.
- Step 4: Applying the fresh diaper. Open the fresh diaper and place it beneath the baby. Fold the diaper properly, ensuring it fits snugly and is not too tight or loose. Make sure to properly align the diaper to avoid leaks.
- Step 5: Applying diaper cream (if needed). If the baby has any redness or irritation, apply a thin layer of diaper cream to the affected area. This helps to protect the skin and prevent further irritation.
- Step 6: Cleaning up. Dispose of the soiled diaper in a designated trash bag. Wash your hands thoroughly to maintain hygiene.
Removing and Disposing of Soiled Diapers
Proper disposal of soiled diapers is crucial for hygiene and sanitation. Improper disposal can lead to the spread of germs and contamination.
- Use a leak-proof disposable bag or container to store the soiled diaper. This prevents leaks and contamination.
- Dispose of the soiled diaper immediately after the change, preferably in a designated trash can.
- Wash your hands thoroughly with soap and water after handling a soiled diaper to prevent the spread of germs.
Preventing Diaper Rash
Diaper rash is a common problem for babies. It is caused by moisture, friction, and irritation. Prevention is key to avoiding discomfort and discomfort.
- Change diapers frequently to avoid moisture build-up.
- Use a thin layer of diaper cream or ointment after each diaper change to protect the skin.
- Avoid using harsh soaps or chemicals on the baby’s bottom.
- Air dry the baby’s bottom after each cleaning to reduce moisture.
- Consider using breathable, absorbent diapers to minimize moisture.
Checking for Irritation
Regular checks for any irritation are vital for early detection and intervention. Early detection allows for timely intervention and prevention of more severe problems.
- Carefully inspect the baby’s genitals for any redness, swelling, or unusual discharge. Be mindful of any signs of irritation or discomfort.
- If any signs of irritation are present, consult a pediatrician for appropriate advice.
Handling Diapering Accidents
Accidents are a common occurrence, especially during the initial stages. These incidents require quick and efficient handling to maintain hygiene and comfort.
Diapering a baby can feel overwhelming, but breaking it down into simple steps makes it manageable. Just like learning new skills, practice makes perfect! Finding a routine that works for both you and your little one is key. It’s similar to creating a healthy work-life balance for your employees, as 10 ways to help your employees have a healthy work life balance highlights.
Remember, consistency and patience are your best tools for success in both scenarios! Focusing on a few simple steps at a time will help you navigate this new stage with confidence.
| Scenario | Action |
|---|---|
| Minor leakage | Gently wipe the area with a clean, damp cloth or wipe. Apply a small amount of diaper cream if needed. |
| Significant leakage | Change the diaper immediately. Clean the area thoroughly and apply diaper cream. |
| Leakage on clothing | Gently blot up the excess moisture with a clean cloth. Change the diaper immediately. |
Specific Diapering Situations: How Diaper Your Baby Step Step Instructions

Navigating the world of baby diapering extends beyond the basics. Understanding how to handle specific situations, from newborns to babies with special needs, ensures comfort and safety for your little one. This section dives into various scenarios, providing practical guidance for successful diaper changes.
Diapering Newborns
Newborn babies often have delicate skin and require extra care during diaper changes. Their skin is thinner and more prone to irritation. Gentle handling and a mindful approach are crucial. Use a soft, damp cloth to clean the area, ensuring no harsh rubbing or pressure. Avoid using harsh soaps or lotions, as they can further irritate the skin.
Ensure the diaper fits snugly but not too tightly, allowing for proper breathing.
Diapering Babies with Special Needs
Babies with mobility challenges or other special needs may require modified diapering techniques. Consider the specific needs of your baby. If your baby has limited mobility, use a changing table or surface that allows for easy access and support. Adapt your approach to accommodate any physical limitations. Always consult with your pediatrician or healthcare provider for personalized guidance and recommendations tailored to your child’s unique circumstances.
Diapering Babies with Sensitive Skin
Babies with sensitive skin require extra care and attention during diaper changes. Look for hypoallergenic diaper brands and wipes, ensuring they are fragrance-free and gentle on the skin. Avoid harsh chemicals and fragrances that can irritate the skin. Use a soft, damp cloth for cleaning. If redness or irritation persists, consult your pediatrician immediately.
Managing Diaper Changes During Outings or Travel
Diaper changes on the go require preparation and organization. Pack extra diapers, wipes, and a small changing mat or blanket. Choose a clean and comfortable location for the change, ensuring adequate space and privacy. Utilize a waterproof changing mat to protect surfaces from spills. Pack a small, portable diaper bag with essentials.
Potential Issues and Solutions
| Issue | Solution |
|---|---|
| Diaper rash | Change diapers frequently, use hypoallergenic products, consider a barrier cream, and consult a pediatrician if the rash worsens. |
| Leakage | Check the fit of the diaper, ensure it is correctly applied, and consider a different diaper size or brand. |
| Soiling outside the diaper area | Use a gentle, damp cloth to clean the area, and apply a barrier cream if necessary. |
| Difficulty changing a baby with mobility challenges | Utilize a changing table or surface that provides easy access and support. Adapt the technique to accommodate the baby’s physical limitations. |
| Diaper not fitting properly | Adjust the diaper for a better fit. Consider trying a different size or brand. |
Safety and Hygiene
Diapering a baby is a delicate balance of nurturing care and meticulous hygiene. Ensuring a safe and healthy environment for your little one is paramount. This section will address common issues, preventive measures, and crucial hygiene practices to maintain your baby’s well-being.Proper diaper hygiene is critical for preventing discomfort and potential health problems. A clean, dry environment around the baby’s genitals is vital.
By understanding the common problems and implementing the right preventive measures, you can significantly contribute to your baby’s comfort and overall health.
Common Diaper-Related Problems and Solutions
Diaper rash, urinary tract infections (UTIs), and skin irritation are common issues related to diaper use. Prompt identification and appropriate solutions are essential for a comfortable experience.
- Diaper Rash: A common problem, diaper rash occurs when the skin in the diaper area becomes irritated and inflamed. Factors such as friction, moisture, and the use of harsh chemicals can contribute to this. Applying a barrier cream can help prevent and treat diaper rash. Change diapers frequently and ensure the baby’s skin is kept clean and dry.
- Urinary Tract Infections (UTIs): While less common, UTIs can affect babies who are not changing diapers frequently. Good hygiene and proper diaper changes are crucial to prevent these infections. If you suspect a UTI, consult a pediatrician immediately. Symptoms may include frequent urination, fever, or pain.
- Skin Irritation: Allergies to certain diaper materials or creams can cause skin irritation. Switching to hypoallergenic materials and observing any allergic reactions can help manage this issue. Consult a pediatrician if the irritation persists or worsens.
Preventing Diaper Rash
Diaper rash is a common issue, often caused by moisture, friction, and irritation. Preventing it involves several key practices.
- Frequent Diaper Changes: Changing diapers frequently is critical to prevent moisture buildup. The frequency depends on the baby’s activity and urination patterns.
- Gentle Cleaning: Use mild, unscented wipes or water to clean the baby’s genital area. Avoid harsh chemicals or soaps.
- Air Dry: Allow the baby’s skin to air dry completely after cleaning to prevent moisture buildup.
- Barrier Creams: Applying a thin layer of a hypoallergenic barrier cream can help create a protective layer against moisture and friction. Choose a cream specifically formulated for babies.
Importance of Cleanliness and Dryness
Maintaining a clean and dry genital area is crucial for preventing infections and discomfort. This involves several steps.
- Gentle Cleansing: Use soft, non-abrasive wipes or water to clean the area gently, avoiding harsh rubbing or scrubbing.
- Thorough Cleaning: Ensure that all urine and stool are removed thoroughly to prevent buildup.
- Air Drying: Allow the area to air dry completely to minimize moisture and the risk of irritation.
Using Fresh, Clean Supplies
Using fresh, clean supplies is vital for hygiene and safety. This includes diapers, wipes, and creams.
- Fresh Diapers: Always use fresh diapers to prevent moisture buildup and potential irritation.
- Clean Wipes: Use clean, fresh wipes to clean the baby’s skin.
- Proper Storage: Store diapers and other supplies in a clean, dry place to maintain their freshness and prevent contamination.
Safe Disposal of Soiled Diapers
Proper disposal of soiled diapers is essential for hygiene and environmental safety.
- Secure Disposal: Dispose of soiled diapers in a designated, leak-proof waste receptacle.
- Leak-Proof Bags: Use leak-proof bags or liners to contain soiled diapers and prevent spills.
- Regular Disposal: Empty and dispose of waste receptacles regularly to prevent odors and potential health hazards.
Additional Considerations
Diapering your little one is a journey filled with learning and adaptation. Beyond the practical techniques, understanding the nuances of your baby’s development and health is key to a smooth experience. This section dives into important considerations beyond the basic steps, helping you anticipate needs and ensure your baby’s well-being.Monitoring your baby’s bowel and bladder habits provides valuable insights into their overall health.
Learning how to diaper your baby step-by-step can seem daunting, but it’s easier than you think! First, gather all your supplies. Next, check for any signs of a wet or soiled diaper, and gently remove the soiled diaper. Consider incorporating some science-backed strategies for a smoother morning routine, like those in this article on science has 10 tricks have happier mornings you should try now.
Finally, carefully apply the clean diaper, ensuring a snug but comfortable fit. These simple steps will have you diaper changing like a pro in no time!
These seemingly simple observations can alert you to potential issues early on, allowing for prompt intervention if needed.
Monitoring Bowel and Bladder Movements
Regular observation of your baby’s bowel and bladder movements helps you identify patterns and potential problems. This includes noting the frequency, consistency, and color of stool, as well as the frequency and volume of urine. Variations from the norm could signal a need to consult a healthcare professional.
Signs Indicating a Need to Consult a Healthcare Professional, How diaper your baby step step instructions
Several signs warrant immediate attention and a consultation with your pediatrician. These include drastic changes in bowel or bladder habits, such as unusually frequent or infrequent bowel movements, unusually hard or loose stools, or unusually dark or pale urine. Changes in the consistency of the stool or urine, blood in the stool or urine, or noticeable pain during urination or bowel movements are also important indicators.
Excessive crying or fussiness associated with these events should also prompt a call to your doctor.
Frequency of Diaper Changes
The frequency of diaper changes varies greatly depending on your baby’s age and feeding habits. Infants, especially newborns, require more frequent diaper changes due to their rapid metabolism and smaller bladders. As babies grow and develop, their needs adjust, and the frequency of changes will naturally decrease.
Diapering Schedules for Different Ages
Diapering schedules are tailored to your baby’s specific needs. Newborns generally require diaper changes every few hours, while older infants and toddlers may need changes every few hours or after feedings. Toddlers might be capable of communicating their needs more clearly, making changes less frequent.
- Newborns (0-3 months): Frequent changes, often every 2-3 hours, or immediately after feedings. This is due to their frequent feedings and rapid metabolism.
- Infants (3-6 months): Changes may decrease slightly, but still important to monitor for signs of discomfort or wetness. Consistency in the schedule is helpful for the baby’s development.
- Toddlers (6 months and up): Diaper changes become less frequent as toddlers develop a better sense of when they need a change. Consistency with a schedule still helps monitor their needs.
Choosing the Right Diaper Size
Selecting the appropriate diaper size is critical for comfort and effectiveness. A poorly fitting diaper can lead to leaks and discomfort. A well-fitting diaper allows for adequate absorption and proper airflow. Consider the following tips when selecting a diaper size.
| Age/Weight Range | Diaper Size Recommendations | Additional Considerations |
|---|---|---|
| 0-5 lbs | Preemie or newborn size | Consider the baby’s unique size. Measure your baby for the best fit. |
| 5-10 lbs | Newborn size | Ensure the diaper fits snugly without being too tight. |
| 10-15 lbs | Size 1 | Measure the waist and leg openings to ensure the best fit. |
| 15-20 lbs | Size 2 | Check for any signs of leaks or discomfort. |
| 20-30 lbs | Size 3 | Check the waist and leg openings regularly to adjust as the baby grows. |
Types of Diapers and Cleaning
Choosing the right diaper for your little one is a significant decision. It impacts both your baby’s comfort and your family’s environmental footprint. This section delves into the different diaper options available, outlining their advantages, disadvantages, and the crucial steps for proper cleaning and maintenance.Understanding the various types of diapers and their care is essential for ensuring your baby’s well-being and minimizing environmental impact.
Different diaper types offer varying levels of convenience, cost, and sustainability.
Disposable Diapers
Disposable diapers are the most common choice for many parents. Their convenience is undeniable; they are readily available, easy to use, and generally require minimal maintenance. However, they have a significant environmental footprint. The manufacturing process often involves substantial resource consumption, and the disposal of these diapers can contribute to landfill waste. Many disposable diapers are made with plastic-based materials, raising concerns about their long-term impact on the environment.
Cloth Diapers
Cloth diapers offer a more sustainable alternative to disposable options. They require more effort in terms of cleaning and maintenance, but they can significantly reduce your environmental footprint. The upfront cost might be higher than disposable diapers, but the long-term savings can be substantial, and the environmental benefits are considerable.
Cleaning and Maintaining Cloth Diapers
Proper cleaning is crucial for maintaining the hygiene and longevity of cloth diapers. Failure to follow appropriate cleaning procedures can lead to bacterial growth and potential health risks.
Types of Cloth Diapers
Cloth diapers come in various styles, each with its own set of pros and cons. Understanding these different types will help you choose the best fit for your lifestyle and baby’s needs.
- All-in-one (AI): These diapers are a popular choice for their convenience. They combine the diaper, cover, and rise into one piece, making them easier to use and change. The one-piece design makes them simple to use and change.
- Fitted: Fitted diapers are designed to fit snugly around your baby’s legs, preventing leaks and ensuring better absorption. They usually consist of a diaper shell and a separate insert. This design can result in fewer leaks than all-in-one diapers.
- Pocket: Pocket diapers consist of a diaper shell with a separate insert that you fill with absorbent material. This flexibility allows for adjusting the absorbency and potentially saving money on inserts. They are generally more adaptable to your baby’s needs than all-in-one or fitted diapers.
Environmental Impact of Diapers
The environmental impact of diapers is a significant consideration. Disposable diapers contribute significantly to landfill waste and require considerable resources for manufacturing. In contrast, cloth diapers, while requiring more effort in care, have a lower environmental impact over their lifespan.
Comparison Table: Different Brands and Types of Cloth Diapers
| Brand | Type | Pros | Cons |
|---|---|---|---|
| BumGenius | AI | Known for comfort and leak-proof performance | Can be a bit bulkier than other types |
| ThinkBaby | Fitted | Highly absorbent, excellent leak protection | Requires more time for washing and drying |
| Pampers Swaddlers | Disposable | Convenience, widely available | Significant environmental impact, high cost over time |
| Honest Company | AI | Soft materials, eco-friendly | Price point can be higher |
Closing Notes
Congratulations! You’ve now equipped yourself with a thorough understanding of baby diapering. By following the step-by-step instructions, you’ll confidently navigate diaper changes, ensuring a comfortable and healthy experience for your little one. Remember to always prioritize hygiene and safety. And don’t hesitate to consult with a healthcare professional if you have any concerns.